商业版快速入门指南
要设置商业版,您需要更新名为 .anaconda 或 conda 的配置文件.condarc。这些更改将更新源存储库配置以访问位于 repo.anaconda.cloud 的商业版存储库。商业版存储库还需要令牌才能访问。
全新的商业版?首先创建一个帐户。
已经拥有帐户、个人资料和新的商业版订阅?跳过以了解如何对商业版进行身份验证。
本主题提供有关以下操作的指导:
- 您可以通过商业版获得什么
- 创建帐户
- 创建配置文件
- 购买商业版
- 安装蟒蛇
- 安装 conda 令牌
- 商业版认证
- 验证您的令牌配置
- 安装 conda-forge(可选)
- 在防火墙或代理后面使用 Anaconda(可选)
- 查找、编辑和查看 .condarc(可选)
- 删除令牌并重置 Conda 配置
创建账户
转至https://anaconda.cloud/register访问商业版入门页面,系统将提示您创建一个帐户。

完成以下步骤:
- 输入您的电子邮件地址和安全密码。
- 选中同意同意我们的服务条款旁边的框。
- 选中验证码框。
- 单击创建我的帐户。
然后,您将被定向到“创建个人资料”页面。

购买商业版
完成以下步骤:
- 选择按月或按年订阅。
- 输入您的帐单信息。
- 选中表示您同意Anaconda 最终用户许可协议的框。
- 点击立即购买。
然后您将被定向到购买摘要页面,其中包含有关访问商业版的详细信息。
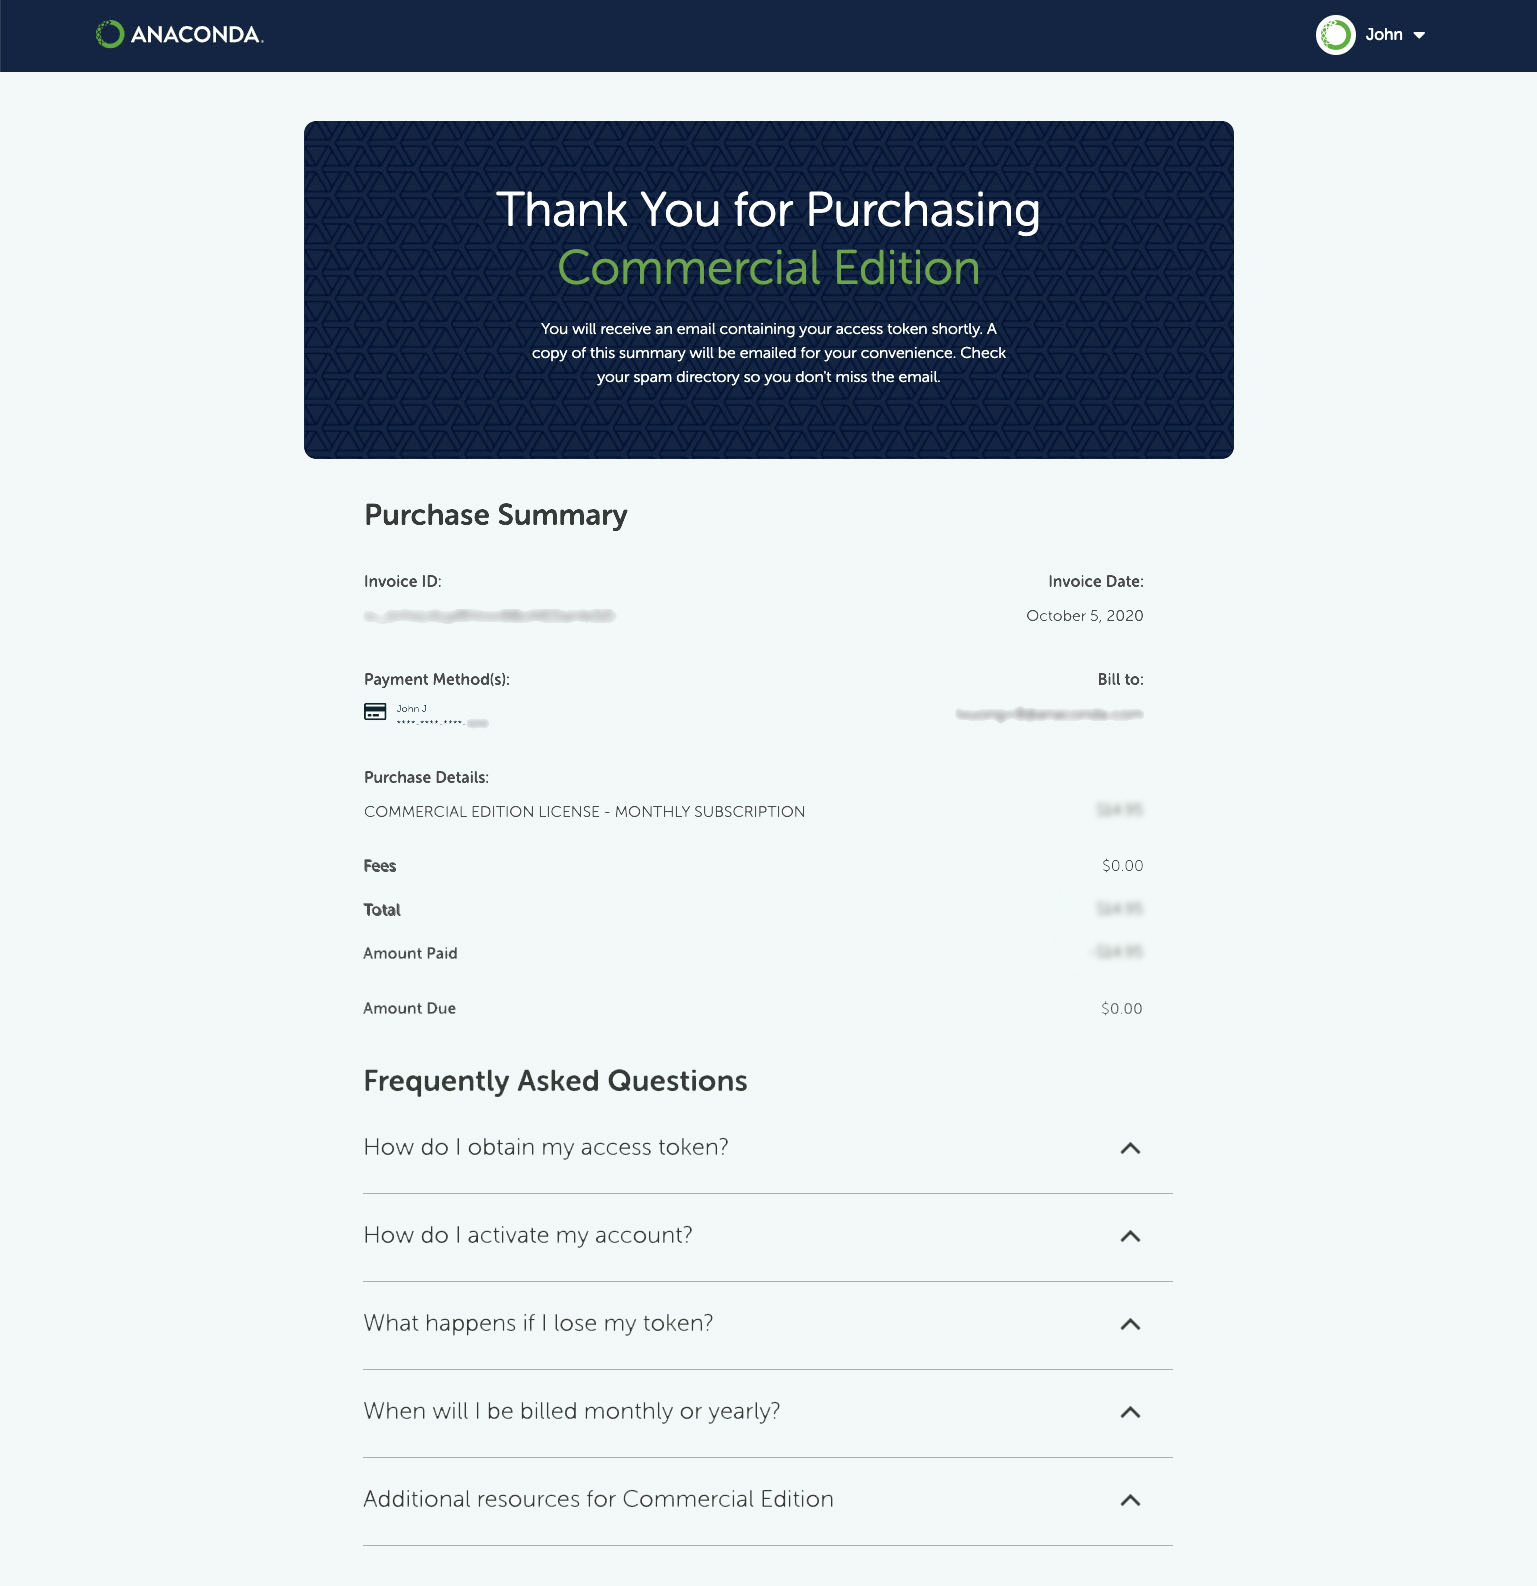
您将收到两封电子邮件:一封确认您的购买,另一封包含您的代币。
小费
包含您的私人访问令牌的电子邮件还包含.condarc已嵌入您的令牌的配置,允许您查看(和复制!)您的个人.condarc配置。

安装 Anaconda 
如果您已经安装了 Anaconda Individual Edition 或 miniconda,那么您就可以继续前进了!
安装 conda 令牌
安装 Anaconda 个人版或 miniconda 后,即可安装 conda 令牌包。conda 令牌包用于编辑.condarc文件并保护您的令牌。
根据您的操作系统选择安装方法:
视窗
从您的 Windows 应用程序库启动Anaconda Navigator。Anaconda Navigator 是个人版的图形界面。
从 Anaconda Navigator 启动 CMD.exe Prompt。此提示将与个人版软件包库相关联。

根据您的提示,运行以下命令以安装 conda 令牌包:
conda install conda-token -n root
Conda 将解决环境问题。您必须输入“y”作为 yes 才能继续安装。
OSX 和 Linux 
启动终端。您应该
(base)在命令行前面看到。这意味着您处于 Anaconda 个人版的基础环境中。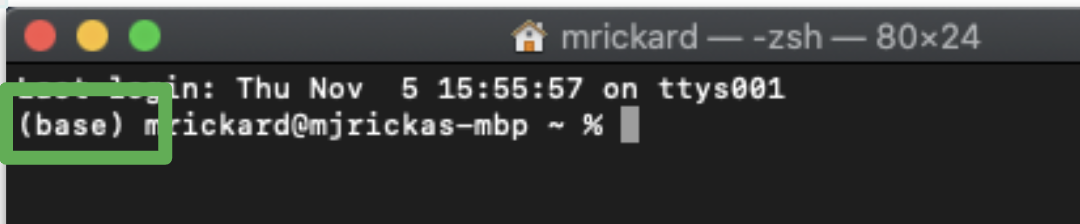
从终端运行以下命令以安装 conda 令牌包:
conda install conda-token -n root
Conda 将解决环境问题。您必须输入“y”作为 yes 才能继续安装。
商业版认证
私人令牌将发送到您在创建帐户时提供的电子邮件地址。您将需要此令牌来激活您的帐户并访问 repo.anaconda.cloud。
警告
您必须将您的令牌保密。
您将需要使用终端对 Anaconda 商业版进行身份验证并配置访问权限。在您的终端中运行以下命令:
# Replace <TOKEN> with the token value you received in your email after purchasing a subscription.
conda token set <TOKEN>
笔记
conda token 将通过检查它是否可用于连接到 Anaconda 商业版来验证您的令牌是否有效。
运行后,您将能够从 Anaconda 商业版安装软件包。conda token set <TOKEN>
运行以获取更多信息和可选配置参数。输出将如下所示:conda token set --help
$ conda token set --help
usage: conda token set [-h]
                       [--include-archive-channels CHANNEL_NAME [CHANNEL_NAME ...]]
                       [--system | --env | --file FILE]
                       token

positional arguments:
  token                 Your token.

optional arguments:
  -h, --help            show this help message and exit
  --include-archive-channels CHANNEL_NAME [CHANNEL_NAME ...]
                        Add archived channels to default_channels. Available
                        channels are mro, mro-archive, free, and pro.

Config File Location Selection:
  Without one of these flags, the user config file at
  '/Users/me/.condarc' is used.

  --system              Write to the system .condarc file at
                        '/Users/me/Applications/miniconda3/.condarc'.
  --env                 Write to the active conda environment .condarc file
                        (/Users/me/Applications/miniconda3). If no
                        environment is active, write to the user config file
                        (/Users/me/.condarc).
  --file FILE           Write to the given file.
验证您的令牌配置
要验证您的令牌是否已成功安装,请在终端中运行以下命令:
conda info
你应该都指向 repo.anaconda.cloud:channel URLs
   active environment : base
   active env location : /Users/<USERNAME>/Applications/miniconda3
           shell level : 1
      user config file : /Users/<USERNAME>/.condarc
populated config files : /Users/<USERNAME>/.condarc
         conda version : 4.9.2
   conda-build version : 3.18.11
        python version : 3.7.7.final.0
      virtual packages : __osx=10.14.6=0
                         __unix=0=0
                         __archspec=1=x86_64
      base environment : /Users/<USERNAME>/Applications/miniconda3  (writable)
          channel URLs : https://repo.anaconda.cloud/repo/main/osx-64
                         https://repo.anaconda.cloud/repo/main/noarch
                         https://repo.anaconda.cloud/repo/r/osx-64
                         https://repo.anaconda.cloud/repo/r/noarch
                         https://repo.anaconda.cloud/repo/msys2/osx-64
                         https://repo.anaconda.cloud/repo/msys2/noarch
         package cache : /Users/<USERNAME>/Applications/miniconda3/pkgs
                         /Users/<USERNAME>/.conda/pkgs
      envs directories : /Users/<USERNAME>/Applications/miniconda3/envs
                         /Users/<USERNAME>/.conda/envs
              platform : osx-64
            user-agent : conda/4.9.2 requests/2.24.0 CPython/3.7.7 Darwin/18.7.0 OSX/10.14.6
               UID:GID : 502:20
            netrc file : None
          offline mode : False
安装 conda-forge(可选)
您可能希望从 conda-forge 存储库安装软件包。为此,请运行以下命令:
conda config --add channels conda-forge
和以前一样,运行以验证更改。conda info
查找、编辑和审查 .condarc(可选)
在某些情况下,您可能需要.condarc直接编辑文件以验证商业版。
警告
将您的令牌放在.condarc文件中是不安全的。因此,上面的conda token 安装方法是首选的工作流程。
您可以.condarc通过在下一节列出的路径之一中编辑文件或运行.conda config
搜索 .condarc 
该.condarc文件可以在多个位置进行配置。可以使用文本编辑器或使用conda config 命令来编辑该文件。
Windows system paths:
     'C:\ProgramData\conda\.condarc',
     'C:\ProgramData\conda\condarc',
     'C:\ProgramData\conda\condarc.d',

Linux and macOS system paths:
     '/etc/conda/.condarc',
     '/etc/conda/condarc',
     '/etc/conda/condarc.d/',
     '/var/lib/conda/.condarc',
     '/var/lib/conda/condarc',
     '/var/lib/conda/condarc.d/',

# Replace CONDA_ROOT with the path for your base conda or Anaconda install.
# Replace CONDA_PREFIX with the path to the current active environment.
# The tilde (~) means home directory on Linux, Mac and Windows.
Local paths on all platforms:
     '$CONDA_ROOT/.condarc',
     '$CONDA_ROOT/condarc',
     '$CONDA_ROOT/condarc.d/',
     '~/.conda/.condarc',
     '~/.conda/condarc',
     '~/.conda/condarc.d/',
     '~/.condarc',
     '$CONDA_PREFIX/.condarc',
     '$CONDA_PREFIX/condarc',
     '$CONDA_PREFIX/condarc.d/',
     '$CONDARC',
 )
如果您运行 conda config 命令,它们将~/.condarc默认写入,但可以使用以下参数更改位置。
为商业版设置 .condarc 
以下是.condarc文件的推荐内容:
restore_free_channel: false
default_channels:
# Replace <TOKEN> with your personal token.
  - https://repo.anaconda.cloud/t/<TOKEN>/repo/main
  - https://repo.anaconda.cloud/t/<TOKEN>/repo/msys2
  - https://repo.anaconda.cloud/t/<TOKEN>/repo/r

  # Uncomment these only if you need them
  # - https://repo.anaconda.cloud/t/<TOKEN>/repo/free
  # - https://repo.anaconda.cloud/t/<TOKEN>/repo/pro
  # - https://repo.anaconda.cloud/t/<TOKEN>/repo/mro-archive
  # - https://repo.anaconda.cloud/t/<TOKEN>/repo/mro

channels:
  - defaults
这里使用Default_channels来确保 conda 不会从 repo.anaconda.com 拉取任何包。
如果您需要使用免费频道,您必须用您的令牌取消注释该行,但保持restore_free_channel设置为false。
添加 conda 通道
警告
不要使用anaconda通道。这将从 anaconda.org 而不是商业版 ( defaults) 中提取软件包。
配置默认频道后,您可以通过在 下列出频道名称来继续使用来自 anaconda.org 的频道channels:。例如,您也可以在频道列表中添加conda-forgeafterdefaults以从conda-forge访问包。
要使用的其他渠道的一些示例:
笔记
安装软件包时,Conda 将在列出的第一个频道中搜索软件包,然后在列出的第二个频道中搜索,依此类推。
使用 conda config 命令配置 .condarc 
以下命令可用于.condarc从任何状态配置文件以正确验证到商业版:
# Replace <TOKEN> with your personal token.
> conda config --set restore_free_channel false
> conda config --prepend default_channels https://repo.anaconda.cloud/t/<TOKEN>/repo/main
> conda config --append default_channels https://repo.anaconda.cloud/t/<TOKEN>/repo/msys2
> conda config --append default_channels https://repo.anaconda.cloud/t/<TOKEN>/repo/r
> conda config --prepend channels defaults
默认情况下,上面的 conda config 命令将编辑主目录中的 condarc 文件。使用下面的 conda 配置文件位置标志,您可以更改.condarc要编辑的文件的路径。
Config File Location Selection:
Without one of these flags, the user config file at '/Users/<USERNAME>/.condarc' is used.

--system            Write to the system .condarc file at
                    '/Users/<USERNAME>/Applications/miniconda3/.condarc'.
--env               Write to the active conda environment .condarc file (/
                    Users/<USERNAME>/Applications/miniconda3).
                    If no environment is active, write to the user config
                    file (/Users/<USERNAME>/.condarc).
--file FILE         Write to the given file.
<USERNAME>你的 Anaconda 用户名在哪里。
如果您还需要这些频道,可以运行以下命令:
# Replace <TOKEN> with your personal token.
> conda config --append default_channels https://repo.anaconda.cloud/t/<TOKEN>/repo/free
> conda config --append default_channels https://repo.anaconda.cloud/t/<TOKEN>/repo/pro
确保 .condarc 配置正确
为了确保您的.condarc文件配置正确,无论是通过运行还是直接编辑文件,请在终端中运行该命令。正如您在下面的示例输出中看到的,通道 URL 指定 repo.anaconda.cloud,而不是repo.anaconda.com。conda configconda info
   >conda info
    active environment : base
   active env location : /Users/<USERNAME>/Applications/miniconda3
           shell level : 1
      user config file : /Users/<USERNAME>/.condarc
populated config files : /Users/<USERNAME>/.condarc
         conda version : 4.8.4
   conda-build version : 3.18.11
        python version : 3.7.7.final.0
      virtual packages : __osx=10.14.6
      base environment : /Users/<USERNAME>/Applications/miniconda3  (writable)
          channel URLs : https://repo.anaconda.cloud/t/<TOKEN>/repo/main/osx-64
                         https://repo.anaconda.cloud/t/<TOKEN>/repo/main/noarch
                         https://repo.anaconda.cloud/t/<TOKEN>/repo/msys2/osx-64
                         https://repo.anaconda.cloud/t/<TOKEN>/repo/msys2/noarch
         package cache : /Users/<USERNAME>/Applications/miniconda3/pkgs
                         /Users/<USERNAME>/.conda/pkgs
      envs directories : /Users/<USERNAME>/Applications/miniconda3/envs
                         /Users/<USERNAME>/.conda/envs
              platform : osx-64
            user-agent : conda/4.8.4 requests/2.24.0 CPython/3.7.7 Darwin/18.7.0 OSX/10.14.6
               UID:GID : 502:20
            netrc file : None
          offline mode : False